Mastering Map Control: Difference between revisions
(((NA))) |
mNo edit summary |
||
| Line 11: | Line 11: | ||
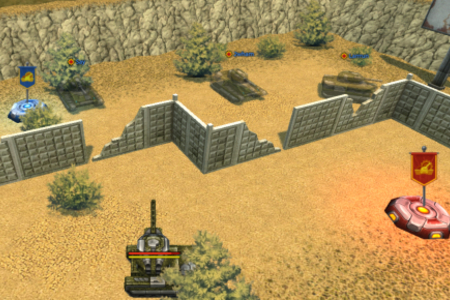
[[File:Mastering_Map_Control1.jpg|right|frame|Strategic Area in Silence Map]] | [[File:Mastering_Map_Control1.jpg|right|frame|Strategic Area in Silence Map|link=]] | ||
One of the first steps to gaining map control is learning the strategic areas. Almost every map has routes that players are almost always forced to pass through, and these zones become natural battlegrounds. Holding a key area allows you to intercept enemy tanks, slow their progress, and create opportunities for your teammates. Skilled players know when to commit to these areas and when to drive away. Overcommitting to too many areas at once usually means losing them all, so it is often more effective to secure one critical area well rather than constantly driving your tank around. True control is not about being everywhere, but about being in the right place at the right time. A team that masters just one decisive area often dictates the flow of the entire match. | One of the first steps to gaining map control is learning the strategic areas. Almost every map has routes that players are almost always forced to pass through, and these zones become natural battlegrounds. Holding a key area allows you to intercept enemy tanks, slow their progress, and create opportunities for your teammates. Skilled players know when to commit to these areas and when to drive away. Overcommitting to too many areas at once usually means losing them all, so it is often more effective to secure one critical area well rather than constantly driving your tank around. True control is not about being everywhere, but about being in the right place at the right time. A team that masters just one decisive area often dictates the flow of the entire match. | ||
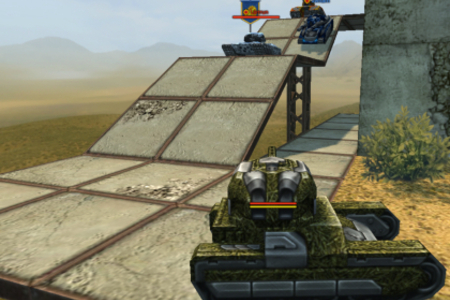
==High Ground== | ==High Ground== | ||
[[File:Mastering_Map_Control2.gif|right|frame|Elevated Platform in Future Map]] | [[File:Mastering_Map_Control2.gif|right|frame|Elevated Platform in Future Map|link=]] | ||
High ground is another essential factor. Elevation gives you better visibility and safer shooting angles. On [[Maps]] like [[Rift]] or [[Future]], ramps and elevated platforms allow you to spot incoming enemy tanks earlier and target them before they reach key areas. However, simply camping on the high ground is not always enough. Smart players move between elevated positions, using them as vantage points rather than static nests, ensuring that their advantage doesn’t become a predictable weakness. The true value of high ground lies not just in vision, but in controlling when and where to engage. By shifting positions, you force enemies to fight on your terms, disrupting their timing and limiting their options. In the hands of a strategic player, high ground becomes less of a outpost and more of a dynamic battlefield tool. | High ground is another essential factor. Elevation gives you better visibility and safer shooting angles. On [[Maps]] like [[Rift]] or [[Future]], ramps and elevated platforms allow you to spot incoming enemy tanks earlier and target them before they reach key areas. However, simply camping on the high ground is not always enough. Smart players move between elevated positions, using them as vantage points rather than static nests, ensuring that their advantage doesn’t become a predictable weakness. The true value of high ground lies not just in vision, but in controlling when and where to engage. By shifting positions, you force enemies to fight on your terms, disrupting their timing and limiting their options. In the hands of a strategic player, high ground becomes less of a outpost and more of a dynamic battlefield tool. | ||
==Spawn Zones== | ==Spawn Zones== | ||
[[File:Mastering_Map_Control3.jpg|right|frame|Tanks in Spawn State]] | [[File:Mastering_Map_Control3.jpg|right|frame|Tanks in Spawn State|link=]] | ||
Awareness of spawn zones is equally important for long-term control. Knowing where enemy tanks respawn can help you predict their possible next move. While excessive spawn camping can be counterproductive, using spawn knowledge intelligently lets you anticipate enemy tanks in advance and destroy them before they start attacking your team. A player should treat spawn awareness as a tool for prediction, not exploitation. Instead of chasing easy kills, it should be used to position your team advantageously and prepare for incoming enemy pushes. | Awareness of spawn zones is equally important for long-term control. Knowing where enemy tanks respawn can help you predict their possible next move. While excessive spawn camping can be counterproductive, using spawn knowledge intelligently lets you anticipate enemy tanks in advance and destroy them before they start attacking your team. A player should treat spawn awareness as a tool for prediction, not exploitation. Instead of chasing easy kills, it should be used to position your team advantageously and prepare for incoming enemy pushes. | ||
| Line 29: | Line 29: | ||
==Communication== | ==Communication== | ||
[[File:Mastering_Map_Control4.png|right|frame|Team Chat]] | [[File:Mastering_Map_Control4.png|right|frame|Team Chat|link=]] | ||
No matter how skilled you are individually, map control is far more powerful when combined with good communication. Sharing clear information in [[Chat]] with your teammates about enemy tanks’ positions and movements makes it easier to coordinate their next push. Instead of rushing forward alone, successful teams move as a unit, combining firepower and timing. Even a single line of precise communication can prevent wasted supplies or needless deaths. Teams that consistently share information build trust, allowing players to act without hesitation when opportunities arise. Silence, on the other hand, often leads to confusion, scattered attacks, and missed chances. Remember, communication is not just about calling out danger, but also signaling retreats, and timing attacks together. The more a team communicates with clarity, the harder it becomes for the enemy to predict or break their next push. | No matter how skilled you are individually, map control is far more powerful when combined with good communication. Sharing clear information in [[Chat]] with your teammates about enemy tanks’ positions and movements makes it easier to coordinate their next push. Instead of rushing forward alone, successful teams move as a unit, combining firepower and timing. Even a single line of precise communication can prevent wasted supplies or needless deaths. Teams that consistently share information build trust, allowing players to act without hesitation when opportunities arise. Silence, on the other hand, often leads to confusion, scattered attacks, and missed chances. Remember, communication is not just about calling out danger, but also signaling retreats, and timing attacks together. The more a team communicates with clarity, the harder it becomes for the enemy to predict or break their next push. | ||
==Supplies== | ==Supplies== | ||
[[File:Mastering Map Control5.gif||right|frame|Incorrect Repair Kit Usage]] | [[File:Mastering Map Control5.gif||right|frame|Incorrect Repair Kit Usage|link=]] | ||
Another crucial aspect of controlling the map is the smart use of [[Supplies]]. First aid kit, double armor, double power, nitro, and mine can all turn the tide of a match, but only when used wisely. A good player knows not to waste a repair kit at full health or use a nitro in unnecessary circumstances. Supplies should be timed strategically, whether for escaping an enemy base, supporting teammates, or denying enemy tanks access to key areas. Patience often makes the difference — holding onto a supply until the exact moment of impact can completely shift the momentum of the match. Supplies are not just for survival, but also for creating opportunities, such as pushing through a key area or baiting enemies into disadvantageous fights. Remember, every supply has the potential to alter the result of the match, but only in the hands of a player who values timing over haste. | Another crucial aspect of controlling the map is the smart use of [[Supplies]]. First aid kit, double armor, double power, nitro, and mine can all turn the tide of a match, but only when used wisely. A good player knows not to waste a repair kit at full health or use a nitro in unnecessary circumstances. Supplies should be timed strategically, whether for escaping an enemy base, supporting teammates, or denying enemy tanks access to key areas. Patience often makes the difference — holding onto a supply until the exact moment of impact can completely shift the momentum of the match. Supplies are not just for survival, but also for creating opportunities, such as pushing through a key area or baiting enemies into disadvantageous fights. Remember, every supply has the potential to alter the result of the match, but only in the hands of a player who values timing over haste. | ||
Revision as of 23:07, 23 August 2025
Main Articles: Battles, Tips and Guides
Foreword: This article might seem focused solely on “Mastering Map Control in CTF Battle Mode”, but some of the points discussed here can be applied in any battle mode.
Shooting is important — but knowing where you are on the map, and how to control it, can turn an average player into a match winner. Map control is the art of positioning, movement, and awareness that allows you to dictate the pace of the match.
Key Areas
One of the first steps to gaining map control is learning the strategic areas. Almost every map has routes that players are almost always forced to pass through, and these zones become natural battlegrounds. Holding a key area allows you to intercept enemy tanks, slow their progress, and create opportunities for your teammates. Skilled players know when to commit to these areas and when to drive away. Overcommitting to too many areas at once usually means losing them all, so it is often more effective to secure one critical area well rather than constantly driving your tank around. True control is not about being everywhere, but about being in the right place at the right time. A team that masters just one decisive area often dictates the flow of the entire match.
High Ground
High ground is another essential factor. Elevation gives you better visibility and safer shooting angles. On Maps like Rift or Future, ramps and elevated platforms allow you to spot incoming enemy tanks earlier and target them before they reach key areas. However, simply camping on the high ground is not always enough. Smart players move between elevated positions, using them as vantage points rather than static nests, ensuring that their advantage doesn’t become a predictable weakness. The true value of high ground lies not just in vision, but in controlling when and where to engage. By shifting positions, you force enemies to fight on your terms, disrupting their timing and limiting their options. In the hands of a strategic player, high ground becomes less of a outpost and more of a dynamic battlefield tool.
Spawn Zones
Awareness of spawn zones is equally important for long-term control. Knowing where enemy tanks respawn can help you predict their possible next move. While excessive spawn camping can be counterproductive, using spawn knowledge intelligently lets you anticipate enemy tanks in advance and destroy them before they start attacking your team. A player should treat spawn awareness as a tool for prediction, not exploitation. Instead of chasing easy kills, it should be used to position your team advantageously and prepare for incoming enemy pushes.
Communication

No matter how skilled you are individually, map control is far more powerful when combined with good communication. Sharing clear information in Chat with your teammates about enemy tanks’ positions and movements makes it easier to coordinate their next push. Instead of rushing forward alone, successful teams move as a unit, combining firepower and timing. Even a single line of precise communication can prevent wasted supplies or needless deaths. Teams that consistently share information build trust, allowing players to act without hesitation when opportunities arise. Silence, on the other hand, often leads to confusion, scattered attacks, and missed chances. Remember, communication is not just about calling out danger, but also signaling retreats, and timing attacks together. The more a team communicates with clarity, the harder it becomes for the enemy to predict or break their next push.
Supplies
Another crucial aspect of controlling the map is the smart use of Supplies. First aid kit, double armor, double power, nitro, and mine can all turn the tide of a match, but only when used wisely. A good player knows not to waste a repair kit at full health or use a nitro in unnecessary circumstances. Supplies should be timed strategically, whether for escaping an enemy base, supporting teammates, or denying enemy tanks access to key areas. Patience often makes the difference — holding onto a supply until the exact moment of impact can completely shift the momentum of the match. Supplies are not just for survival, but also for creating opportunities, such as pushing through a key area or baiting enemies into disadvantageous fights. Remember, every supply has the potential to alter the result of the match, but only in the hands of a player who values timing over haste.
Balancing Attack and Defense
See also: Guides to hulls
True mastery of map control also requires knowing when to attack and when to defend. Many players make the mistake of pushing too far forward, only to get killed and give away strategic areas to the enemy. The key is to balance aggression with restraint. Heavier Hulls are better suited for defending, while lighter and faster hulls can react to changing circumstances and attack at the right moment. Sometimes retreating is not a sign of weakness but a tactical choice to regroup and counter-attack.
Adapting to Battle Modes
Adapting your approach to map control also requires considering the Battle modes — that is what separates good players from great ones. Overall, there are 4 battle modes in the game: Deathmatch [DM], Team Deathmatch [TDM], Capture the Flag [CTF], and Control Points [CP], and each has its own playing style. Knowing the characteristics of each mode will immensely improve your ability to master the map. Some maps are better suited for DM, such as Dusseldorf or Madness; others for CTF, such as Sandbox or Silence; some for CP such as Polygon. But this doesn’t necessarily mean these maps are only played in those battle modes — it is just that most players prefer to play on them in that particular mode. You can further improve your knowledge on this by spending time in the game and actually playing it.