Hulls: Difference between revisions
(((NA)) New Article - Hulls) |
(Added XT ((ME))) |
||
| (12 intermediate revisions by 8 users not shown) | |||
| Line 1: | Line 1: | ||
__NOTOC__ __NOEDITSECTION__ | |||
[[File:HullsBanner.png|center|800x800px|HullsBanner|link=]] | |||
[[File: | |||
== | == [[Wasp]] == | ||
[[File: | {{HullCard | ||
|preview=Wasp3.png | |||
|name=Wasp | |||
|description=Lightweight, economical, and easy to operate, the Wasp is a perfect hull for beginners. An upgraded Wasp can reach fairly high speeds, which, combined with its small size, provides great freedom of movement on the battlefield. Due to its low weight, the Wasp can easily be flipped over by enemy gunfire. | |||
|armor=40 | |||
|speed=100 | |||
|turn-speed=100 | |||
|mass=40 | |||
|power=81 | |||
|m0-rank=[[File:IconsNormal_02.png|link=Private]] | |||
|m0-price=200 | |||
|m1-rank=[[File:IconsNormal_09.png|link=First Sergeant]] | |||
|m1-price=7 650 | |||
|m2-rank=[[File:IconsNormal_15.png|link=Third Lieutenant]] | |||
|m2-price=62 450 | |||
|m3-rank=[[File:IconsNormal_24.png|link=Major General]] | |||
|m3-price=172 600 | |||
|additional=[[How to Use Wasp (Tips and Tricks)]] | |||
}} | |||
== | == [[Hornet]] == | ||
[[File: | ''See also'': [[Hornet XT]] | ||
{{HullCard | |||
|preview=Hornet3.png | |||
|name=Hornet | |||
|description=This compact hull uses the latest generation of composite materials, making it light, quick, and highly survivable even after a direct hit. The Hornet is perfect for quick attacks. | |||
|armor=47 | |||
|speed=92 | |||
|turn-speed=87 | |||
|mass=44 | |||
|power=88 | |||
|m0-rank=[[File:IconsNormal_05.png|link=Master Corporal]] | |||
|m0-price=500 | |||
|m1-rank=[[File:IconsNormal_12.png|link=Warrant Officer 2]] | |||
|m1-price=21 000 | |||
|m2-rank=[[File:IconsNormal_19.png|link=Captain]] | |||
|m2-price=86 600 | |||
|m3-rank=[[File:IconsNormal_27.png|link=Marshal]] | |||
|m3-price=215 500 | |||
|additional=[[How to Use Hornet (Tips and Tricks)]] | |||
}} | |||
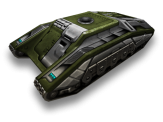
== | == [[Hunter]] == | ||
[[File: | {{HullCard | ||
|preview=Hunter3.png | |||
|name=Hunter | |||
|description=The Hunter is the most versatile hull in the game. With a balanced combination of reinforced steel armor plates and low energy consumption, this hull is an all-purpose option. It’s suitable for everyone, from sprinters to snipers. Its versatility ensures you’ll always have a role on the battlefield. | |||
|armor=63 | |||
|speed=77 | |||
|turn-speed=93 | |||
|mass=55 | |||
|power=88 | |||
|m0-rank=[[File:IconsNormal_01.png|link=Recruit]] | |||
|m0-price=0 | |||
|m1-rank=[[File:IconsNormal_08.png|link=Master Sergeant]] | |||
|m1-price=3 200 | |||
|m2-rank=[[File:IconsNormal_15.png|link=Warrant Officer 5]] | |||
|m2-price=54 400 | |||
|m3-rank=[[File:IconsNormal_23.png|link=Brigadier]] | |||
|m3-price=158 300 | |||
|additional=[[How to Use Hunter (Tips and Tricks)]] | |||
}} | |||
== | == [[Dictator]] == | ||
[[File: | {{HullCard | ||
|preview=Dictator3.png | |||
|name=Dictator | |||
|description=Thanks to its advanced active defense system and the use of the latest composite materials, this hull effectively absorbs the energy from the impacts of almost any caliber gun. With the Dictator, you can fight on the front lines of any battle. As one of the fastest and best-protected hulls in the game, the Dictator is large, making it an easy target. | |||
|armor=77 | |||
|speed=62 | |||
|turn-speed=87 | |||
|mass=60 | |||
|power=94 | |||
|m0-rank=[[File:IconsNormal_04.png|link=Corporal]] | |||
|m0-price=400 | |||
|m1-rank=[[File:IconsNormal_11.png|link=Warrant Officer 1]] | |||
|m1-price=16 550 | |||
|m2-rank=[[File:IconsNormal_18.png|link=First Lieutenant]] | |||
|m2-price=78 550 | |||
|m3-rank=[[File:IconsNormal_26.png|link=General]] | |||
|m3-price=201 200 | |||
|additional=[[How to Use Dictator (Tips and Tricks)]] | |||
}} | |||
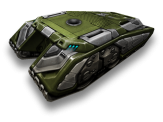
== | == [[Viking]] == | ||
[[File: | ''See also'': [[Viking XT]] | ||
This is not a tank | {{HullCard | ||
|preview=Viking3.png | |||
|name=Viking | |||
|description=This armor incorporates all modern military technologies. Reinforced armor and a "Type 2" engine make the Viking one of the most versatile hulls. Whether attacking the enemy or covering your teammates, this hull will prove itself to be reliable and trustworthy in any situation. | |||
|armor=70 | |||
|speed=70 | |||
|turn-speed=73 | |||
|mass=55 | |||
|power=94 | |||
|m0-rank=[[File:IconsNormal_07.png|link=Staff Sergeant]] | |||
|m0-price=700 | |||
|m1-rank=[[File:IconsNormal_14.png|link=Warrant Officer 4]] | |||
|m1-price=29 900 | |||
|m2-rank=[[File:IconsNormal_21.png|link=Lieutenant Colonel]] | |||
|m2-price=102 700 | |||
|m3-rank=[[File:IconsNormal_29.png|link=Commander]] | |||
|m3-price=244 200 | |||
|additional=[[How to Use Viking (Tips and Tricks)]] | |||
}} | |||
== [[Titan]] == | |||
{{HullCard | |||
|preview=Titan3.png | |||
|name=Titan | |||
|description=Titan alloy armor plates, combined with special geometry, make this hull highly effective even against large-caliber weapons. With the Titan, you can charge into the thick of battle without hesitation. However, please note that due to its low speed, this hull is not suitable for fast attacks behind enemy lines. | |||
|armor=93 | |||
|speed=46 | |||
|turn-speed=60 | |||
|mass=91 | |||
|power=100 | |||
|m0-rank=[[File:IconsNormal_03.png|link=Gefreiter]] | |||
|m0-price=300 | |||
|m1-rank=[[File:IconsNormal_10.png|link=Sergeant-Major]] | |||
|m1-price=12 100 | |||
|m2-rank=[[File:IconsNormal_17.png|link=Second Lieutenant]] | |||
|m2-price=70 500 | |||
|m3-rank=[[File:IconsNormal_25.png|link=Lieutenant General]] | |||
|m3-price=187 000 | |||
|additional=[[How to Use Titan (Tips and Tricks)]] | |||
}} | |||
== [[Mammoth]] == | |||
{{HullCard | |||
|preview=Mammoth3.png | |||
|name=Mammoth | |||
|description=This is not just a tank — it’s a fortress on tracks. The Mammoth is the flagship among other hulls. Extremely heavy and reinforced with super-concrete, this hull is slow, but that doesn’t prevent the Mammoth from successfully engaging multiple enemy tanks. | |||
|armor=100 | |||
|speed=38 | |||
|turn-speed=53 | |||
|mass=100 | |||
|power=94 | |||
|m0-rank=[[File:IconsNormal_06.png|link=Sergeant]] | |||
|m0-price=600 | |||
|m1-rank=[[File:IconsNormal_13.png|link=Warrant Officer 3]] | |||
|m1-price=25 450 | |||
|m2-rank=[[File:IconsNormal_20.png|link=Major]] | |||
|m2-price=94 650 | |||
|m3-rank=[[File:IconsNormal_28.png|link=Fieldmarshal]] | |||
|m3-price=229 900 | |||
|additional=[[How to Use Mammoth (Tips and Tricks)]] | |||
}} | |||
= Hull Overview = | |||
{{HullOverview}} | |||
[[Category: Gameplay]] | |||
Latest revision as of 12:08, 23 February 2025

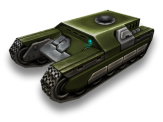
Wasp

Price: 200 ![]()

Price: 7 650 ![]()

Price: 62 450 ![]()

Price: 172 600 ![]()
Lightweight, economical, and easy to operate, the Wasp is a perfect hull for beginners. An upgraded Wasp can reach fairly high speeds, which, combined with its small size, provides great freedom of movement on the battlefield. Due to its low weight, the Wasp can easily be flipped over by enemy gunfire.
![]()
Protection
![]()
Top speed
![]()
Turn speed
![]()
Weight
![]()
Power
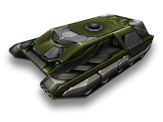
Hornet
See also: Hornet XT


Price: 500 ![]()

Price: 21 000 ![]()

Price: 86 600 ![]()

Price: 215 500 ![]()
This compact hull uses the latest generation of composite materials, making it light, quick, and highly survivable even after a direct hit. The Hornet is perfect for quick attacks.
![]()
Protection
![]()
Top speed
![]()
Turn speed
![]()
Weight
![]()
Power
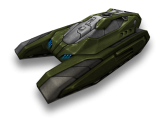
Hunter

Price: 0 ![]()

Price: 3 200 ![]()
Price: 54 400 ![]()

Price: 158 300 ![]()
The Hunter is the most versatile hull in the game. With a balanced combination of reinforced steel armor plates and low energy consumption, this hull is an all-purpose option. It’s suitable for everyone, from sprinters to snipers. Its versatility ensures you’ll always have a role on the battlefield.
![]()
Protection
![]()
Top speed
![]()
Turn speed
![]()
Weight
![]()
Power
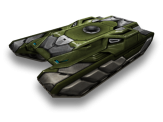
Dictator

Price: 400 ![]()

Price: 16 550 ![]()

Price: 78 550 ![]()

Price: 201 200 ![]()
Thanks to its advanced active defense system and the use of the latest composite materials, this hull effectively absorbs the energy from the impacts of almost any caliber gun. With the Dictator, you can fight on the front lines of any battle. As one of the fastest and best-protected hulls in the game, the Dictator is large, making it an easy target.
![]()
Protection
![]()
Top speed
![]()
Turn speed
![]()
Weight
![]()
Power
Viking
See also: Viking XT

Price: 700 ![]()

Price: 29 900 ![]()

Price: 102 700 ![]()

Price: 244 200 ![]()
This armor incorporates all modern military technologies. Reinforced armor and a "Type 2" engine make the Viking one of the most versatile hulls. Whether attacking the enemy or covering your teammates, this hull will prove itself to be reliable and trustworthy in any situation.
![]()
Protection
![]()
Top speed
![]()
Turn speed
![]()
Weight
![]()
Power
Titan

Price: 300 ![]()

Price: 12 100 ![]()

Price: 70 500 ![]()

Price: 187 000 ![]()
Titan alloy armor plates, combined with special geometry, make this hull highly effective even against large-caliber weapons. With the Titan, you can charge into the thick of battle without hesitation. However, please note that due to its low speed, this hull is not suitable for fast attacks behind enemy lines.
![]()
Protection
![]()
Top speed
![]()
Turn speed
![]()
Weight
![]()
Power
Mammoth

Price: 600 ![]()

Price: 25 450 ![]()

Price: 94 650 ![]()

Price: 229 900 ![]()
This is not just a tank — it’s a fortress on tracks. The Mammoth is the flagship among other hulls. Extremely heavy and reinforced with super-concrete, this hull is slow, but that doesn’t prevent the Mammoth from successfully engaging multiple enemy tanks.
![]()
Protection
![]()
Top speed
![]()
Turn speed
![]()
Weight
![]()
Power